
A Tale of Two Gavels
I'm an officer of Kennedy Space Center's Anime club, KSC Anime. We inherited the club, sort of, and I reckon we are about the 3rd generation of officers in as many years.
This post is not about anything the club has done. This post is about the gavels I made my fellow officers to celebrate a long-overdue update to our bylaws.
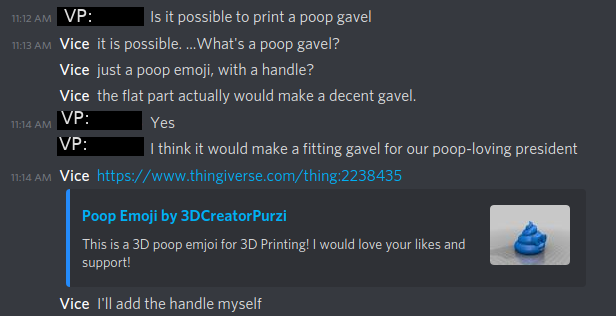
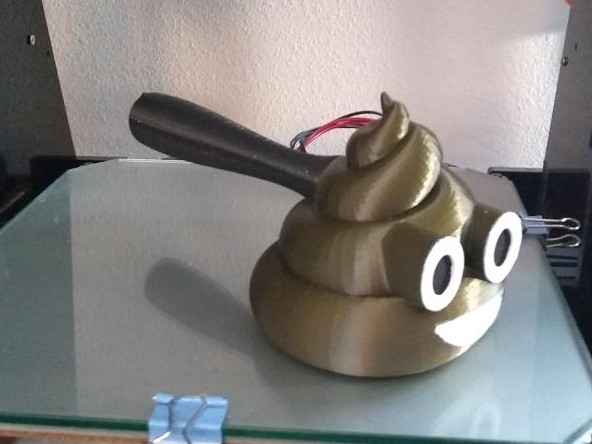
Poop Emoji Gavel
Firstly, the gavel for our club's president. Inspiration: As our president has a Catalan heritage, they've introduced us to the concept of the Caganer - a tradition of adding a crapping dude to the Christmas nativity. There's also the Christmas Log, a log that kids feed so that it craps presents. Naturally, we came to the conclusion that our president has a genuine affinity for doo-doo.
I should state at this point: this was entirely the VP's idea, and while I did run with it, I would not have remotely taken the initiative without their push.
Call to Action
Design
I started with this Poop Emoji model. I needed to add a handle to it, but as an STL file, I wasn't able to edit it immediately in FreeCAD. I had to massage the imported STL by following this article. In case the article goes down, I'll summarize the import steps:
- Import the model with file > import.
- From Part workbench, select part > Create shape from mesh... with the STL object selected, default tolerance is probably fine.
- use the Part workbench's Advanced Utilities menu with the new shape selected to create a Solid from Shell.
This resulting "Solid" object could be cut or unioned with the OpenSCAD workbench, which is what I was after.
I created a cylinder in the correct orientation, translated it to the spot I wanted to subtract, and took the cylinder shape out of the poop emoji.
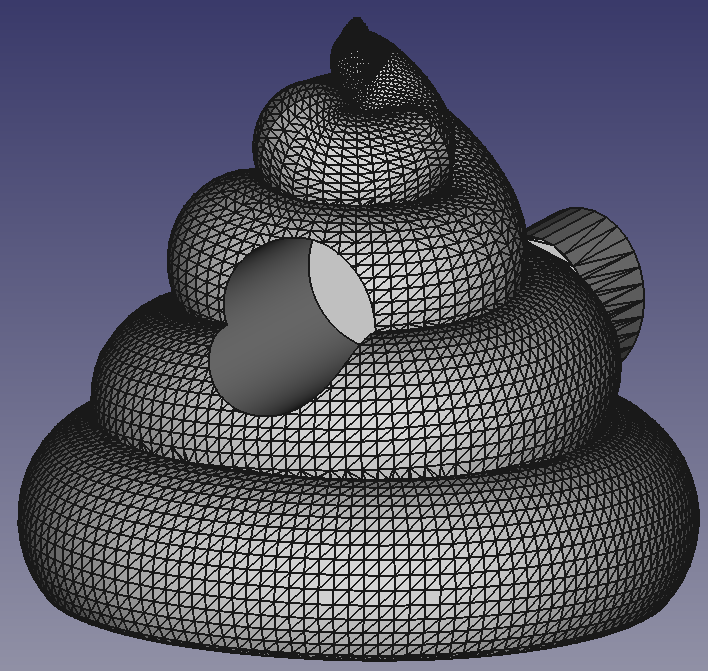
Next, a handle. Anyone can 3D print a cylinder, I wanted this handle to have a bit of judge-like, gavel-y flare. I never bothered to fully constrain the sketch for the handle, I just put in my critical measurements (handle socket minus some printable tolerance, desired length) and connected the top to the bottom with some arcs and a bezier curve.
To make a proper handle, I used a revolve to make my one-sided design into a handle. Since this part is made via revolution, the critical dimension in the sketch (width) is equal to the radius of the subtracted cylinder. The final handle's diameter will be twice the sketch's width.
The handle should have fit in my printer's build volume, but I apparently have a wire too tight - above 140mm, my thermistor is unplugged from the socket from the motion of the Z-axis. I split the handle in two and added a morise/tenon. There's a semisphere subtracted from the end of the tenon so I can conveniently hold a little glob of E6000 when joining the two parts.
Painting
The emoji was printed with a hole in the back, but it doesn't pop. Time to paint this a little bit.
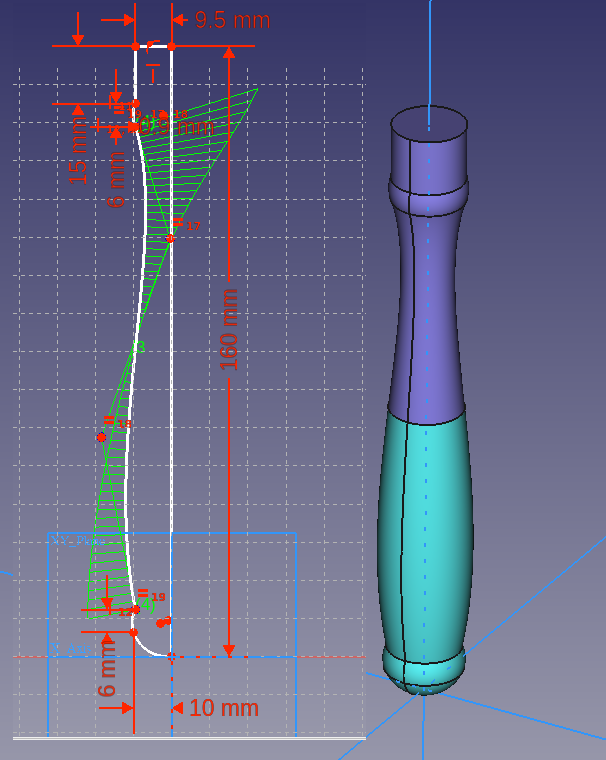
Tape
Primer
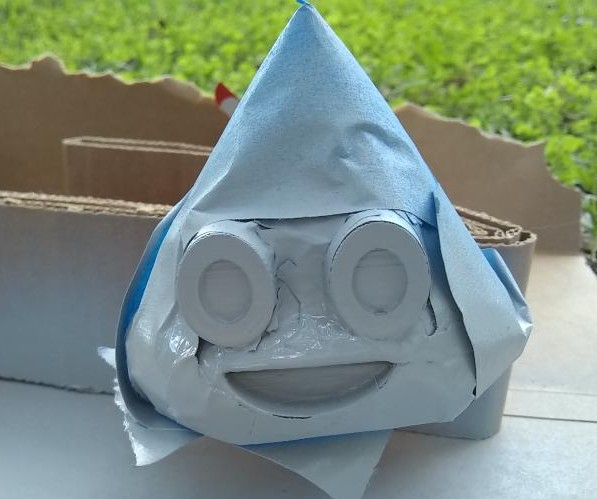
Hand painted features
At this point, I had something of a personal awakening, and started to concoct a surprise for the VP.
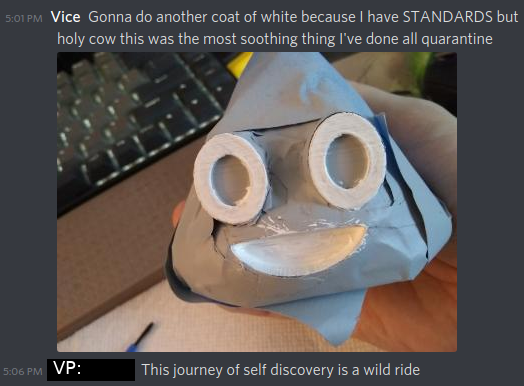
Voilà!
Painted, glued, and done:
The Gavel Surprise
After utterly smashing it at executing the VP's vision for a poop emoji gavel, discovering that hand painting stuff was incredibly fun, and having a quick think on the organizational indespensibility that our VP embodies, I decided that they couldn't go gavelless in this exchange.
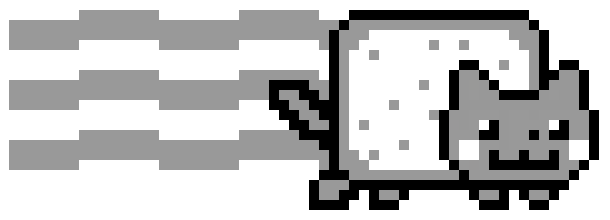
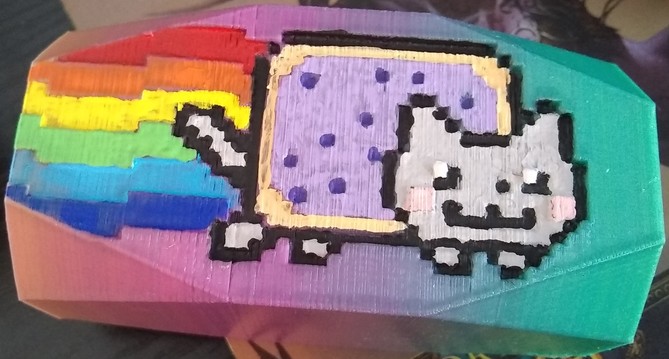
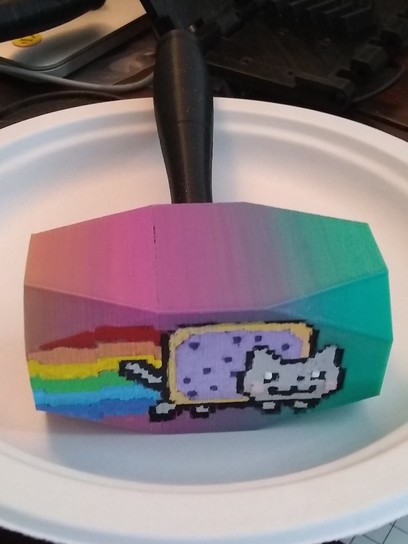
The poop emoji gavel would be our surprise for the president, and this custom meme-gavel would be my surprise for the VP. I settled on a simple Nyan cat concept, with a vaguely Mjolnir-like shape to it.
Design
I fiddled with the positioning here a little bit, but didn't work on it too rigorously. I started with a cuboid of roughly poop-emoji proportions, so that the gavels would be roughly the same size and weight. I subtracted a corner off, then mirrored that over all three axes to get a neat shape.
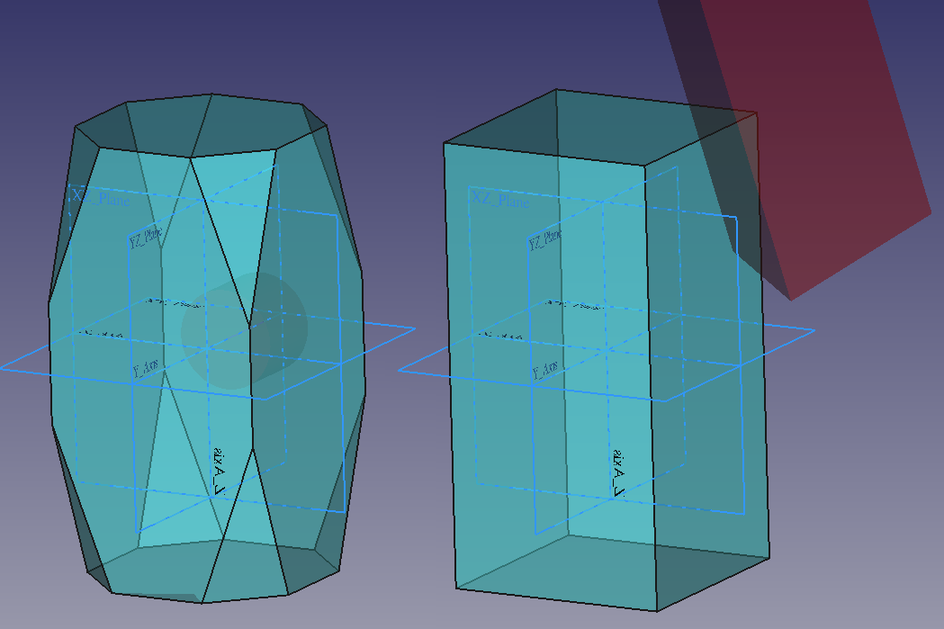
It would have been nice if the bottom and top of the hammer were regular octagons, and the diagonal-straight-diagonal edges were equal thirds, but I didn't put that much effort into a "mathematically correct" shape.
I originally considered emobssing or raising text on the sides, but ultimately only the Nyan pixels were the only priority going forward.
Nyan Pixels
I am not a confident painter. I wanted a physical guide for my brush, so I chose to subtract Nyan cat's pixels from the surface of the hammer at varying heights. But what heights? There's a LOT of colors, but thanks to Four color theorem, there should be a maximum of 4 heights I need to make all bumps distinct. It turns out, for Nyan cat, I only needed 3.
I started by getting an image of Nyan cat into GIMP, and using the "magic select tool" to turn every color of pixels into an independent layer. I then re-colored the elements of Nyan cat white, black, or grey for the different bump layers. I also scaled it down to "1-pixel-is-1-pixel" size.
For the next step, I used Python to process my heavily-processed image into more digestible data, but I don't see any reason why the step of reducing to 3 or 4 colors couldn't be automated. If I make pixel art a recurring design element, I may look into that.
I used a simple script to look for transparent, black, white, and either of the inconsistent greys I used. The output is an array that I copy/pasted into FreeCAD's python console.
#nyan to array

from PIL import Image

img = Image.open("/home/john/Design/custom_gavel/3color-nyan.png")
w, h = img.size

def nearest_color(c):
  r, g, b, a = c
  avg = int((r+g+b)/3.0)
  if a != 255: return ' '
  elif avg == 255: return '@' # white
  elif avg ==152 or avg == 153: return '#' # grey
  else: return '.' # black

ary = []

for y in range(h):
  ary.append([])
  for x in range(w):
    px=nearest_color(img.getpixel((x,y)))
    print(px, end='')
    ary[-1].append(px)
  print('')

print(ary)
From here, I needed to transform the values into different height cuboids, and put them in their position.
This code I executed in FreeCAD to turn my pixel data to a cuttable/unionable shape. This is where I defined the height of each pixel (0.5mm increments) and the pixel size (1.75mm side length).
nyan = [[]] # use the output from PIL script

def add_pixel(name, height=0.1, xyzlist=[0,0,0], pxsize=1.0):
    px = Part.makeBox(pxsize,height,pxsize)
    obj = FreeCAD.ActiveDocument.addObject("Part::Feature", name)
    obj.Shape = px
    # set position
    obj.Placement.translate(FreeCAD.Vector(xyzlist))

    #FreeCAD.ActiveDocument.recompute()
    return obj

def gen_nyan(pxsize=1.75):
  height_dict = {'@': 1, '#': 1.5, '.': 2, ' ': 0.5}
  x = 0.0
  for row in nyan:
    y = 0.0
    for c in row:
      add_pixel(f"px{x}-{y}", height_dict[c], [x, 22.5, y], pxsize)
      y += pxsize
    x += pxsize
I manually did a OpenSCAD union on the hundreds of pixel squares generated. To advance the convenience of this a bit, I bet I could work with an image already imported into FreeCAD, pare it down to 3 or 4 heights automatically, and do the union at the end. The pixels could also be colored to match either the original image, or at least a different shade for each height. This is a novel technique to me and it's quite unrefined at this stage.
Here's what it looks like:
I translated this weird shape into position so that the lowest blocks (the transparent pixels on my 3-color image; everything in the rectangle that wasn't Nyan cat) didn't remove any material from the outside of the gavel's head. The three height levels cut away from the surface, leaving me boxes to paint in.
Printing
I printed one gavel head with some rainbow filament I had - at about 32% infill, to hit a target weight of 100 grams. Unfortunately, even with the high infill, the rainbow filament shifted very little over the entire model.
I looked at the calendar... not a lot of time until I'd see my fellow officers... but was able to get a fresh roll of rainbow filament next-day on Amazon.
Within an hour of the filament being dropped on my doorstep, I fired up a 60 hour print job to make five gavel heads in one go - 540g of filament. I didn't realize it at the time, but this job was almost double the duration of any previous print job I've done. My beloved "Junkheap A8" had two partial clogs during the print (!!) though thankfully while I was awake to pause, move the print head, and clear the jam.
The print finished when I should have already been in bed, over 2 days later.
Painting
I started with some clear primer, paying special attention to fill in some of the underextrusion gaps in the print. My 3D printing equipment is not the most professional-grade...
The bump map worked out magnificently, and I carefully hand-painted on my best attempt at mixing up Nyan cat's traditional colors. It's my personal theory that Nyan cat is cannonically cherry flavored, based on the frosting + sprinkles coloring.
Conclusion
I had a lot of fun designing and printing these, and they both loved their gavels.
...Maybe I should make my own now?